Speed, it seems to me, provides the one genuinely modern pleasure.
-- Aldous Huxley
Junior web developers often download and install programs through a website. My setup would speed up your onboarding on your new work MacOS machine and migrate risk of incorrectly installing a program as while having a beautiful terminal. I will show you my personal setup and configuration for terminal and Visual Studio Code in MacOS. One of the first thing I do with a new Mac machine is install Homebrew.
Homebrew is a package manager for macOS that allows users to easily install and manage software on their computers. Some benefits of using Homebrew include:
- Easy installation and management of software: Homebrew makes it easy to install and manage software on macOS. Users can easily search for, install, and update software using simple command-line commands.
- Access to a wide variety of software: Homebrew offers a large and growing collection of software packages, including many that are not available through Apple's App Store or other package managers.
- Consistency across different systems: Homebrew helps to ensure that software is installed and configured consistently across different systems, making it easier to manage and maintain software in a multi-user or multi-system environment.
- Open-source: Homebrew is an open-source project, which means that it is developed and maintained by a community of contributors. This can help to ensure that the software is well-maintained and regularly updated.
So let's open terminal.app and run these command to install:
# Reference: https://brew.sh
# Install Homebrew
/bin/bash -c "$(curl -fsSL https://raw.githubusercontent.com/Homebrew/install/HEAD/install.sh)"
# ...
# ==> Checking for `sudo` access (which may request your password)...
# After pressing return, enter your Mac password
# ...
# Press RETURN/ENTER to continue or any other key to abort:
# You will be prompted to press return when the terminal tells you it will install Xcode Command Line Tools
# Downloading and installing Xcode Command Line Tools would take the most time
# After Homebrew is installed, I would opt out of analytics
brew analytics off
Sweet! Now that Homebrew is installed, we can start downloading and installing programs through the terminal. You can see the list of things you can install:
# Reference: https://formulae.brew.sh/cask/iterm2
brew install --cask iterm2
# Reference: https://formulae.brew.sh/cask/iterm2
brew install --cask iterm2
# Reference: https://formulae.brew.sh/cask/iterm2
brew install --cask iterm2
# Reference: https://formulae.brew.sh/cask/iterm2
brew install --cask iterm2
What just happen after running that command successfully is now we have iTerm2 installed on your computer. If you search with Spotlight or navigate to Applications in Finder, you will see iTerm2.app.
I don't use the native MacOS terminal, unstead use iTerm2 as a complete replacement for Terminal mainly because of customizability and plugin support. Often times when you see a aesthetically pleasing terminal on MacOS, they are using iTerm2. Many developers like customizating their terminal because they spend a lot of time looking at it and some theme do hold utility like color constrast and status information. The plugin support allows me to be proficient with my commands or typing.
Open iTerm2.app and let's install fonts to customize terminal and later Visual Studio Code.
# Reference: https://github.com/Homebrew/homebrew-cask-fonts
brew tap homebrew/cask-fonts
brew install --cask font-inter
brew install --cask font-jetbrains-mono-nerd-font
# Reference: https://github.com/Homebrew/homebrew-cask-fonts
brew tap homebrew/cask-fonts
brew install --cask font-inter
brew install --cask font-jetbrains-mono-nerd-font
# Reference: https://github.com/Homebrew/homebrew-cask-fonts
brew tap homebrew/cask-fonts
brew install --cask font-inter
brew install --cask font-jetbrains-mono-nerd-font
# Reference: https://github.com/Homebrew/homebrew-cask-fonts
brew tap homebrew/cask-fonts
brew install --cask font-inter
brew install --cask font-jetbrains-mono-nerd-font
Sometimes, homely things are done for the best reasons in the world and thus achieve a beauty of their own.
-- Gene Weingarten
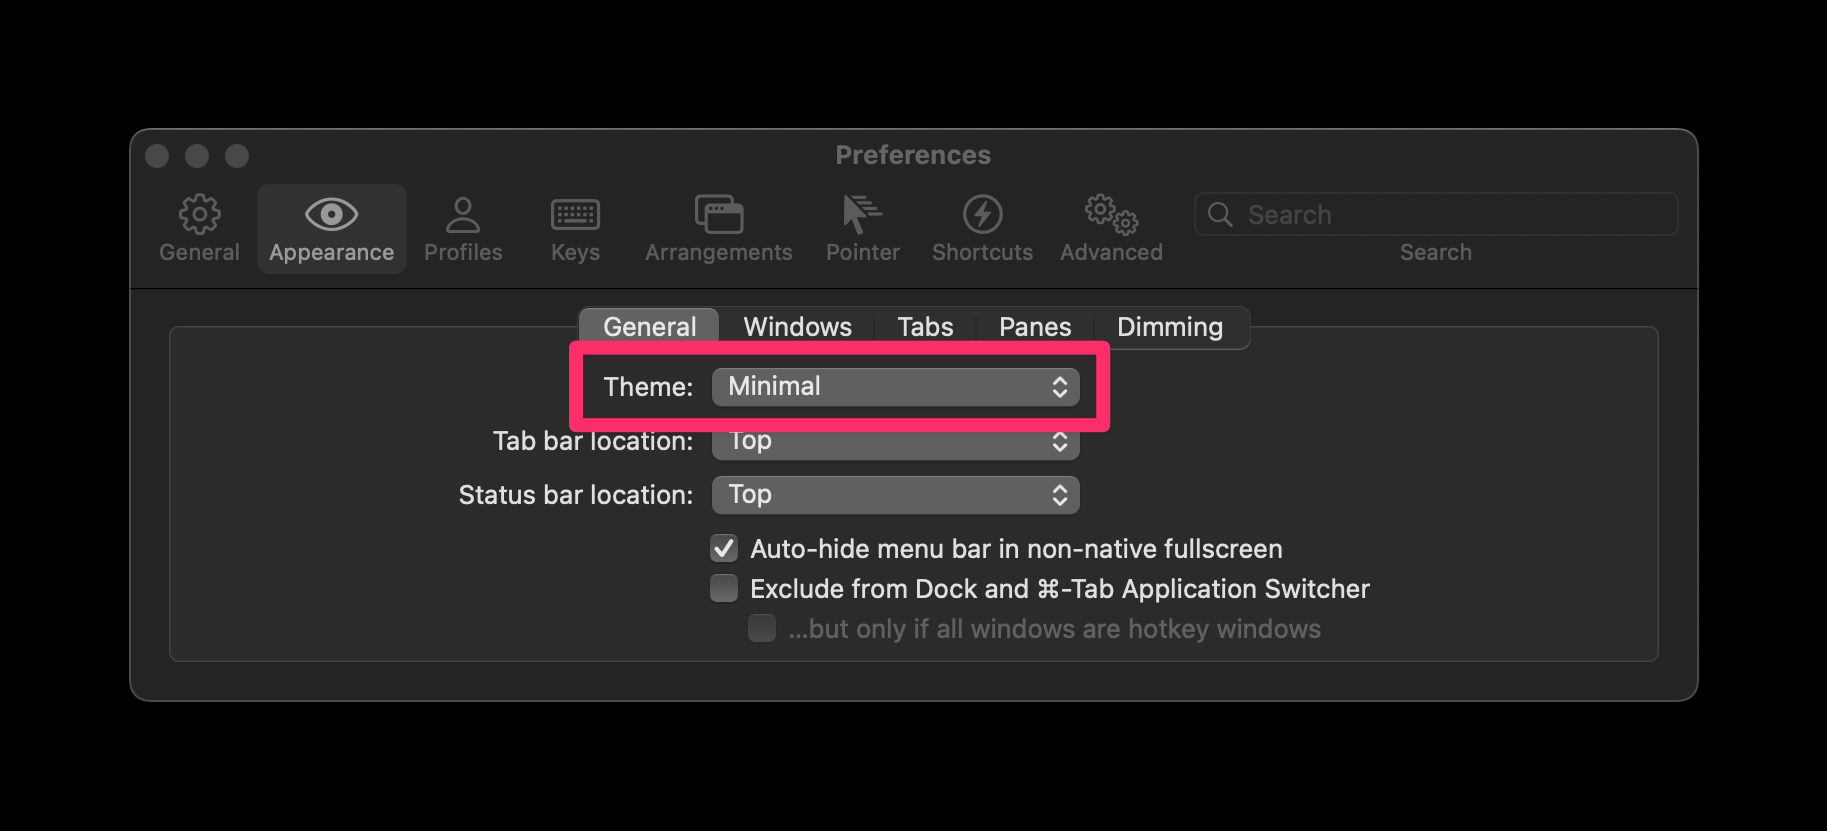
Awesome! We just installed font through the terminal. Let's customizise the look of iTerm2 to how I would. Navigate to iTerm2 > Settings > Appearance > General and let's change the theme dropdown from the default regular to minimal. I like the uniform look.
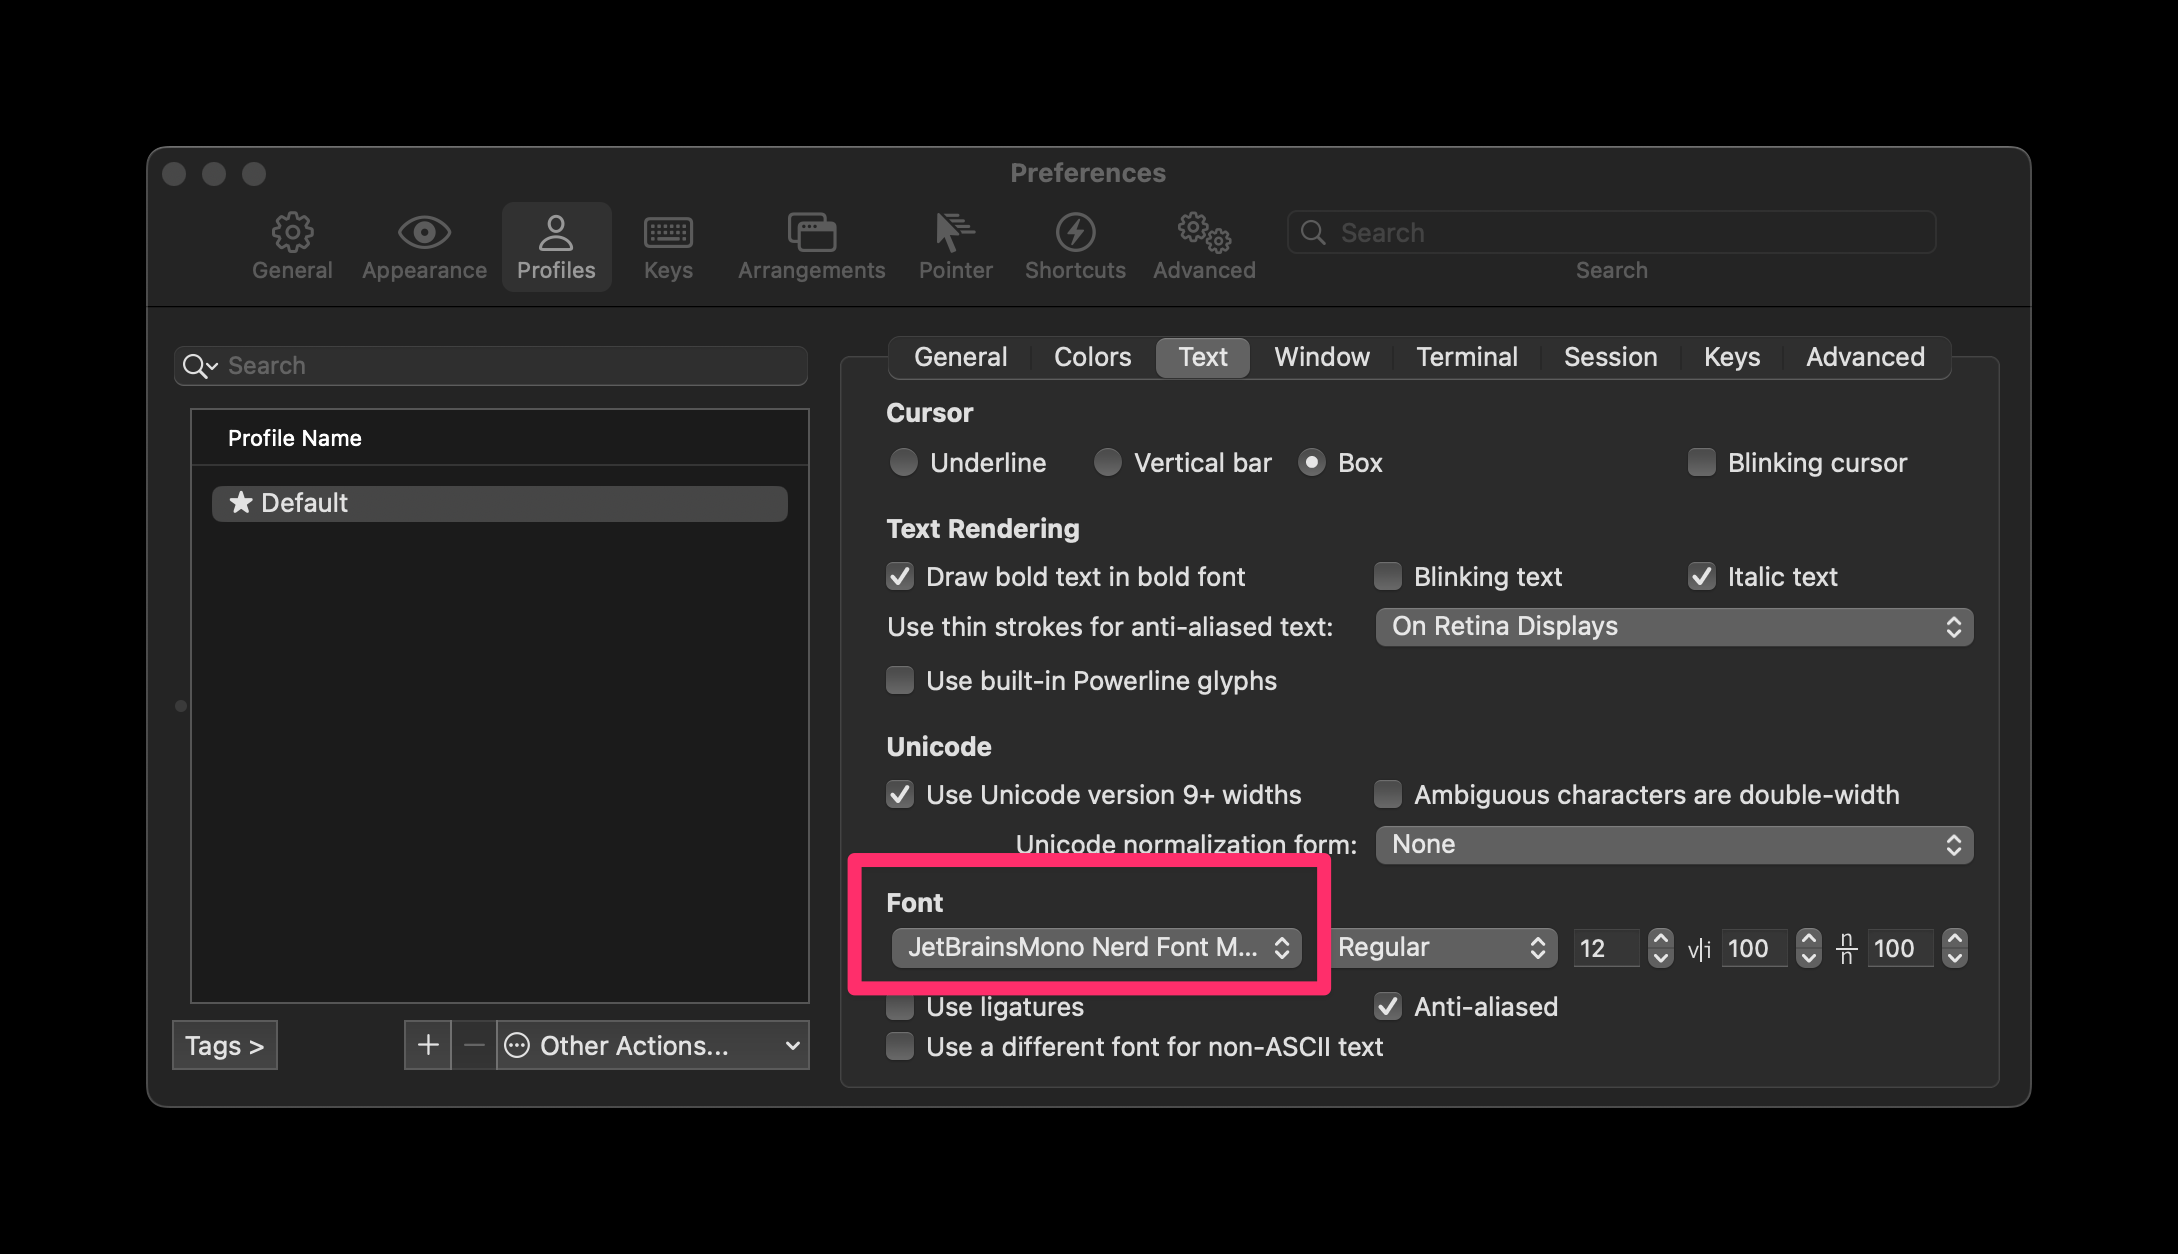
We are going to change the font of iTerm2 now. Navigate to iTerm2 > Settings > Profile > Text and let's change the font dropdown to JetBrainsMono Nerd Font Mono.
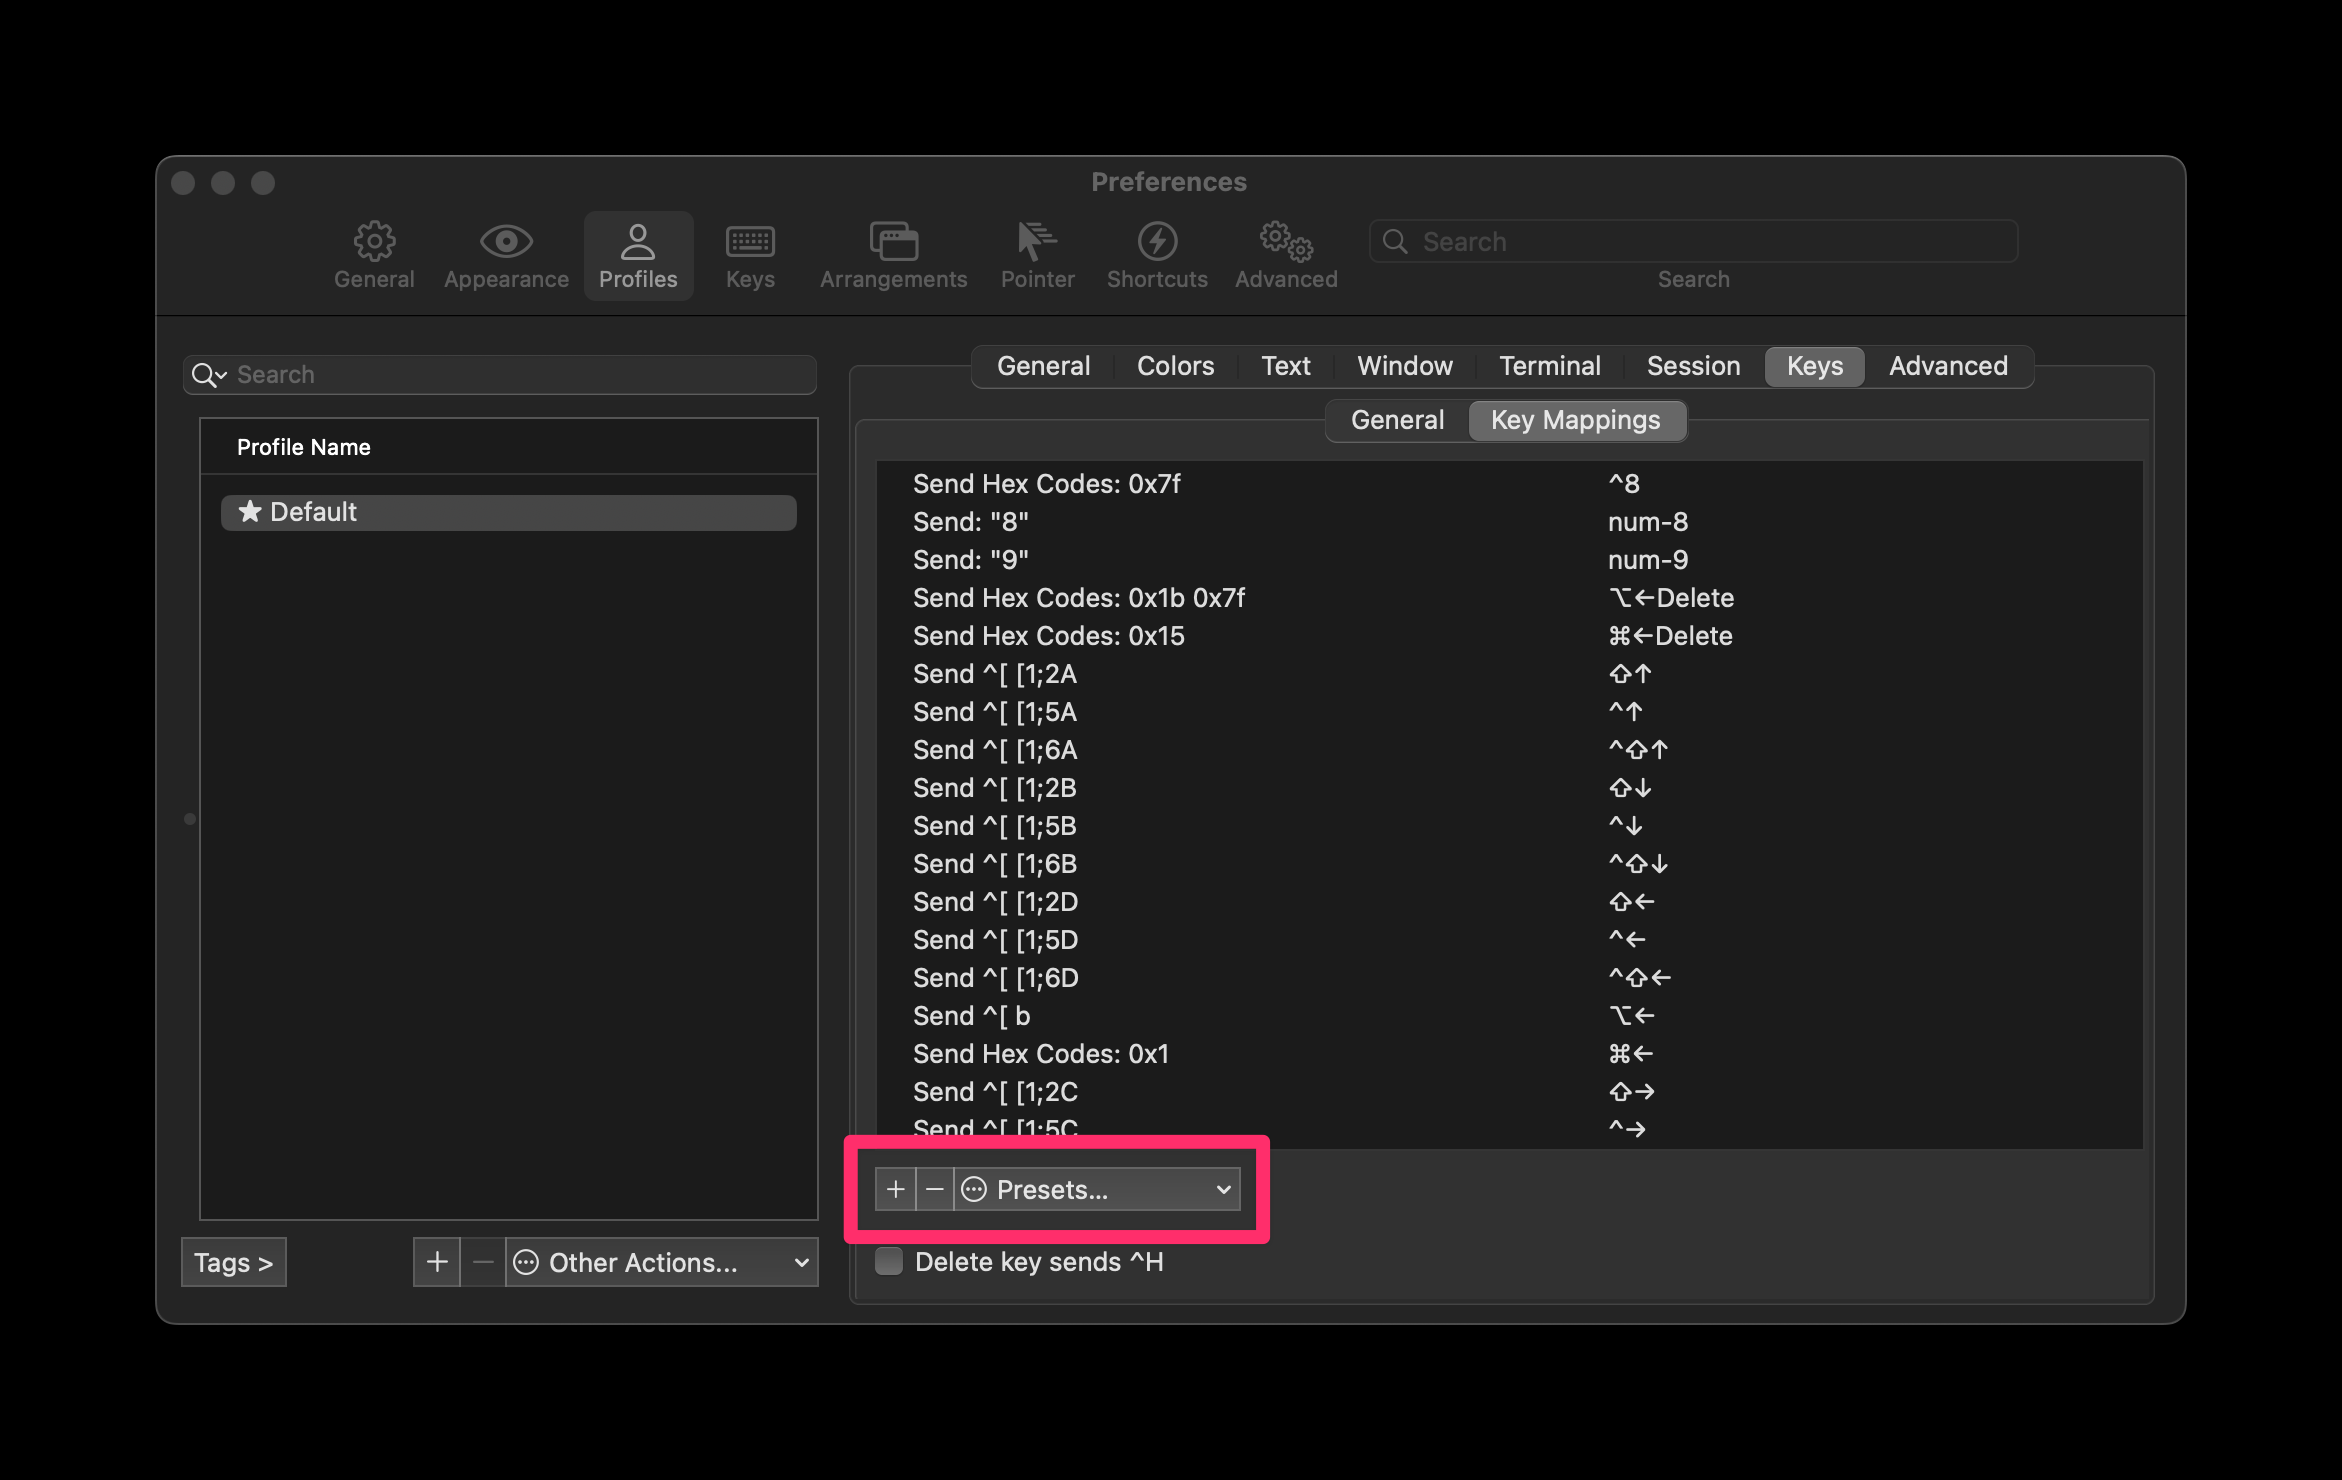
The final thing in iTerm2's setting I configure is key mappings. You know how in Google Documents or any text editor, we can do command + <- or command + -> to go to front and back of the line. I want natural key mapping in my terminal instead of the default. Navigate to iTerm2 > Settings > Profile > Keys > Key Mappings and let's change the preset dropdown to Natural Text Editing.
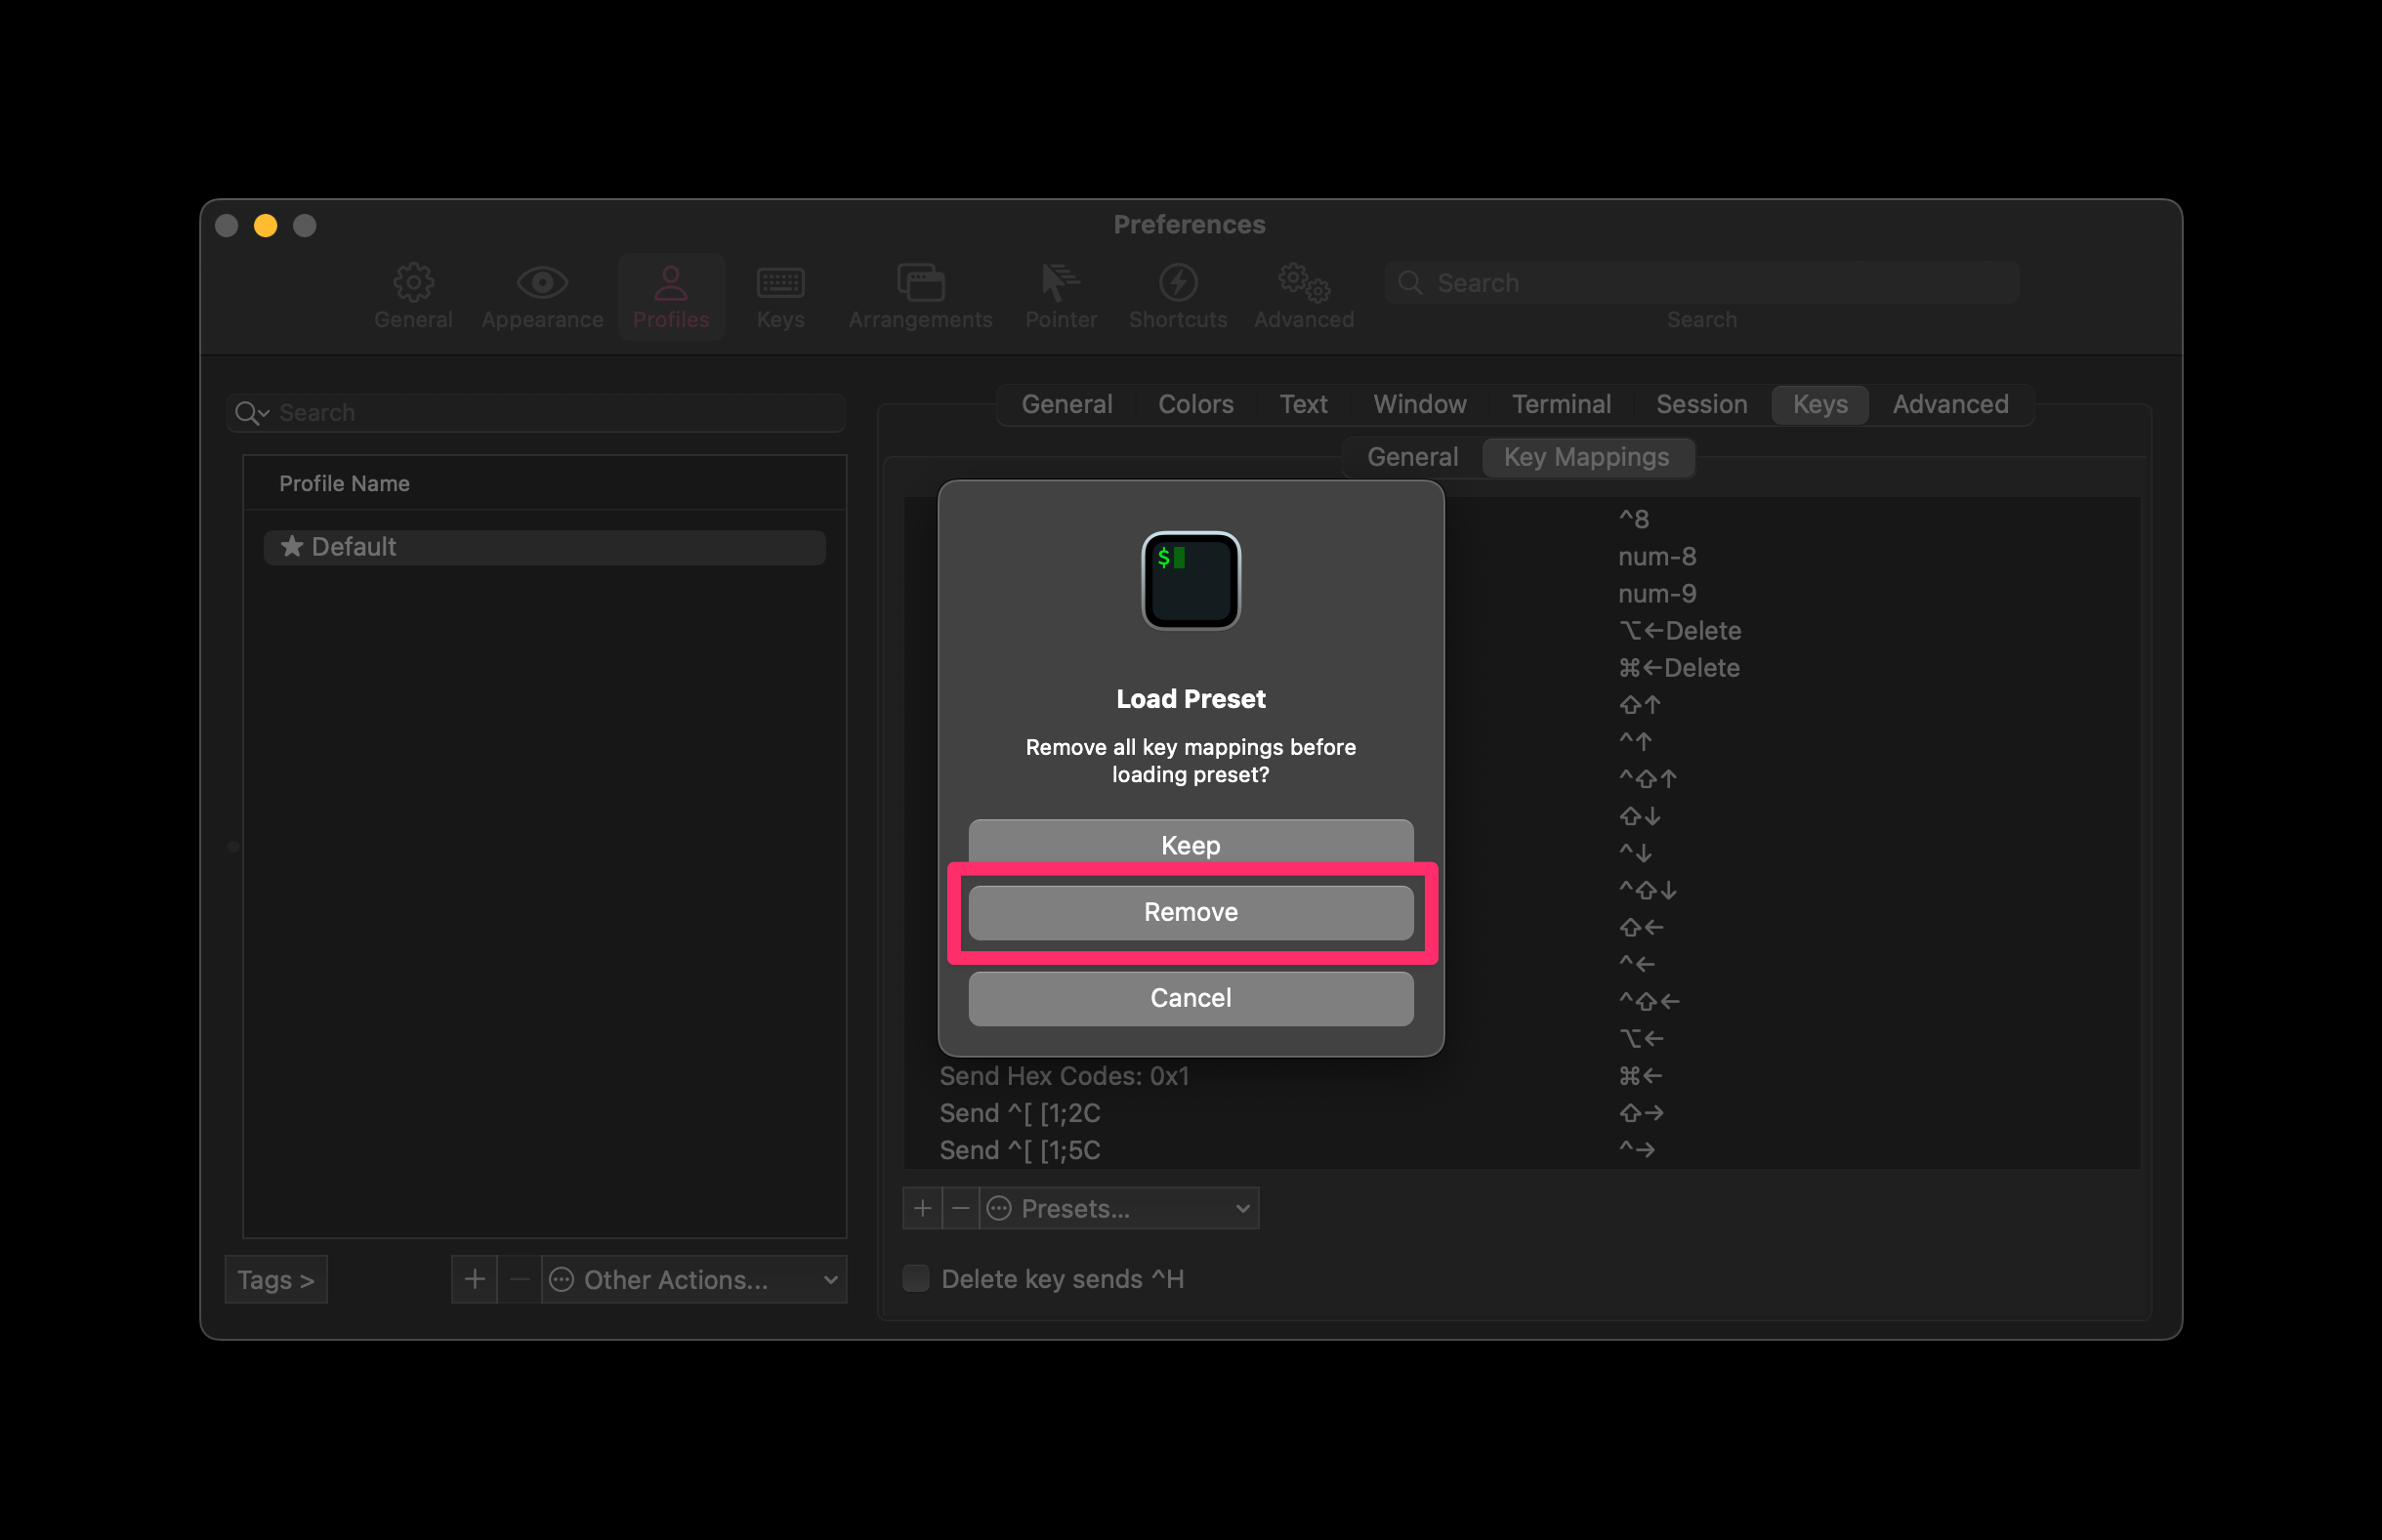
When you change the key preset, it will prompt you whether to remove all key mappings before loading preset and I would remove.
Nice! Now we have natural key mapping in your terminal. My favorite commands are:
- Delete whole line:
command + delete
- Jump word:
option + <- option + ->
- Jump line:
command + <- command + ->
Next up, we are going to add some utility to our terminal. The utility I am going to add is Starship. Starship shows status infomation like project name, icon, branch and node version in projects. The second utility is autosuggestions. It would show suggestions, and you can press tab to accept the suggestion command. These two utilities are great addition to our developers experience.
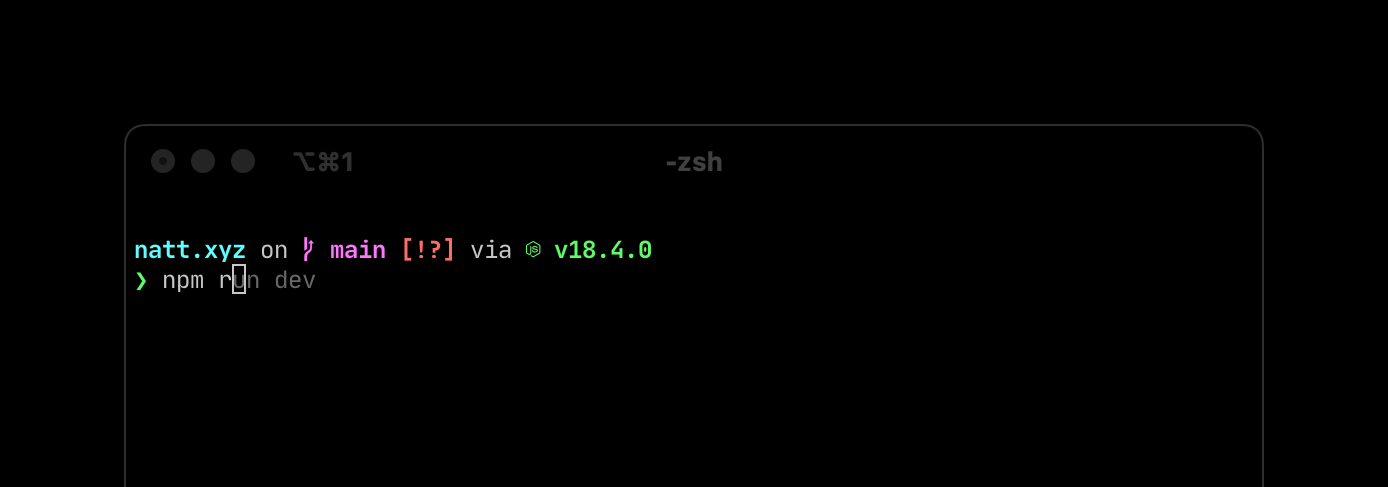
# Reference: https://formulae.brew.sh/formula/starship
brew install starship
# Reference: https://formulae.brew.sh/formula/zsh-autosuggestions
brew install zsh-autosuggestions
# Reference: https://formulae.brew.sh/formula/starship
brew install starship
# Reference: https://formulae.brew.sh/formula/zsh-autosuggestions
brew install zsh-autosuggestions
# Reference: https://formulae.brew.sh/formula/starship
brew install starship
# Reference: https://formulae.brew.sh/formula/zsh-autosuggestions
brew install zsh-autosuggestions
# Reference: https://formulae.brew.sh/formula/starship
brew install starship
# Reference: https://formulae.brew.sh/formula/zsh-autosuggestions
brew install zsh-autosuggestions
After we install those things, we need to configure the .zshrc file. It is unintuitive to write out Neovim or Vim commands to edit a file. The easiest way I edit the files is through Visual Studio Code with the code command.
Let's install Visual Studio Code.
# Reference: https://formulae.brew.sh/cask/visual-studio-code
brew install --cask visual-studio-code
# Reference: https://formulae.brew.sh/cask/visual-studio-code
brew install --cask visual-studio-code
# Reference: https://formulae.brew.sh/cask/visual-studio-code
brew install --cask visual-studio-code
# Reference: https://formulae.brew.sh/cask/visual-studio-code
brew install --cask visual-studio-code
Excellent, now that we have Visual Studio Code installed, we have access to the code command to edit the .zshrc file.
# Opens `.zshrc` file in Visual Studio Code
code ~/.zshrc
# Opens `.zshrc` file in Visual Studio Code
code ~/.zshrc
# Opens `.zshrc` file in Visual Studio Code
code ~/.zshrc
# Opens `.zshrc` file in Visual Studio Code
code ~/.zshrc
Opening files and editing files is a useful developer skill. Newer generation developers tend to go the user interface route like editing with Visual Studio Code instead through terminal.
Let's add these configuration to complete the utility setup.
# Starship
eval "$(starship init zsh)"
# Autosuggestions
source $(brew --prefix)/share/zsh-autosuggestions/zsh-autosuggestions.zsh
# Starship
eval "$(starship init zsh)"
# Autosuggestions
source $(brew --prefix)/share/zsh-autosuggestions/zsh-autosuggestions.zsh
# Starship
eval "$(starship init zsh)"
# Autosuggestions
source $(brew --prefix)/share/zsh-autosuggestions/zsh-autosuggestions.zsh
# Starship
eval "$(starship init zsh)"
# Autosuggestions
source $(brew --prefix)/share/zsh-autosuggestions/zsh-autosuggestions.zsh
We need to restart our terminal for the configurations to take effect. Quit iTerm2 with the shortcut command + q and then reopen it. And voila, your terminal looks ballin.
I have this snippet on my Notion to fast track software installation if I reset or receive a MacOS machine.
# Install Homebrew
/bin/bash -c "$(curl -fsSL https://raw.githubusercontent.com/Homebrew/install/HEAD/install.sh)"
# Opt out of analytics
brew analytics off
# Install must-haves
# Software
brew install --cask figma
brew install --cask google-chrome
brew install --cask iterm2
brew install --cask raycast
brew install --cask visual-studio-code
# Fonts
brew tap homebrew/cask-fonts
brew install --cask font-jetbrains-mono-nerd-font
brew install --cask font-inter
# Utility
brew install starship
brew install zsh-autosuggestions
# zshrc configuration
# code ~/.zshrc
# # Starship
# eval "$(starship init zsh)"
# # Autosuggestions
# source $(brew --prefix)/share/zsh-autosuggestions/zsh-autosuggestions.zsh
# iTerm2 settings
# iTerm2 > Settings > Appearance > General
# Theme: Minimal
# iTerm2 > Settings > Profile > Text
# Font: JetBrainsMono Nerd Font Mono
# iTerm2 > Settings > Profile > Keys > Key Mappings
# Preset: Natural Text Editing
# Potential level 1
brew install --cask airbuddy
brew install --cask cleanshot
brew install --cask ledger-live
brew install --cask minecraft
brew install --cask raindropio
brew install --cask spotify
# Potential level 2
brew install --cask firefox
brew install --cask microsoft-edge
brew install --cask tableplus

